How to Import a Lab into Cisco Modeling Labs (CML)
Cisco Modeling Labs imports and exports labs as a single YAML (.yaml) topology file, which makes sharing and importing labs simple. If someone hands you a CML .yaml file (or you download one), here's how to get it running.
Practice on hands-on Cisco CML labs.
Step by step
1. Save the lab's .yaml file somewhere you can find it. A CML topology is one self-contained YAML file describing the nodes, links, and starting configuration.
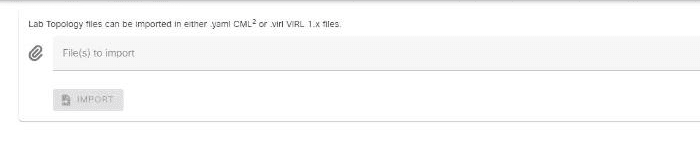
2. In the CML dashboard, choose Import (or 'Add Lab' → Import) and select the .yaml file. CML reads the topology and creates the lab without you drawing anything.
3. Open the lab and start it. CML boots each node from its image; the first boot of a few routers and switches takes a little time.
4. Once the nodes are up, open a console to any device and you're on real Cisco IOS — configure, verify, and troubleshoot exactly as you would on hardware.
If a node won't start
The most common cause is that your CML instance doesn't have the image the lab references, or you've hit a node limit (common on the free tier). The image problem almost always traces back to the reference platform not being installed during setup: CML boots each device from a node/image definition, and if the reference platform images aren't present, the node has a definition but nothing to run. Confirm each node type the lab uses shows an installed image under Tools → Node and Image Definitions. Goldfish Networks labs stick to the standard reference-platform types — the IOL router ('iol-xe'), the IOL Layer 2 switch ('ioll2-xe'), and Alpine hosts ('alpine') — so installing the reference platform once covers every lab. If instead you've hit the free-tier node limit, stop other running labs first.
When the import itself fails: version, node definition and licence errors
An import that is rejected before a lab appears is a different problem from the one above, where the lab exists and its nodes will not boot. Nothing was created, so there is nothing to open in the UI, and all you get is a line of error text about a schema or a definition. Three things cause nearly all of it: the CML release, the node definitions the file names, and — on the paid editions only — licensing.
Release direction matters more than the version numbers themselves. A topology written by a newer controller can carry schema fields an older one has never seen, so importing into the same release or a newer one is the safe direction and going backwards is the one that breaks. If someone hands you a file that will not load, ask which CML version produced it before you start editing it.
Node definitions are the more common cause, and you can settle that question without importing at all. Every node in the YAML names a node_definition — the device type, such as iol-xe — and some also pin an image_definition, meaning one exact image version. A definition your controller does not have fails outright. The pinned image_definition is the fragile one: it demands that specific image, so a controller carrying a different release of the same platform either rejects the file or accepts it and leaves that node with nothing it is allowed to boot. Deleting the pinned lines lets CML fall back to whichever image it has installed for that definition, which is almost always what the author meant.
Licensing is worth ruling out, but it does not fail the import itself. Importing a topology only creates lab objects on the controller and consumes no node entitlement, so a lapsed licence lets the import succeed and then refuses the nodes when you press Start. If the lab appeared and the nodes will not boot with an error naming licensing rather than the lab file, check Tools → Licensing on the controller. CML-Free has no licence to register in the first place, so if that is what you are running, this class of failure does not apply to you.
# Read the topology before you hand it to a controller. Every node names a
# device type; some also pin one exact image version.
$ grep -E 'node_definition|image_definition' lab.yaml | sort | uniq -c
      2         node_definition: iol-xe
      1         node_definition: ioll2-xe
      1         node_definition: alpine
      1         image_definition: iol-xe-17-12-01

# That pinned image_definition is the line that breaks portability. Strip it
# and CML uses whatever image is installed for the node definition instead.
# Keep the original by writing to a new file rather than editing in place:
$ sed '/image_definition:/d' lab.yaml > lab-portable.yaml

# Then match the remaining device types against what the controller actually
# has, under Tools -> Node and Image Definitions in the CML UI.
A lab to import every day
Goldfish Networks labs ship as exactly this kind of single-file, YAML, built on CML free-tier images so they import in one click. Grab the free sample, import it with the steps above, and grade your finished config against the answer key.
Sanity-check the import before you build anything
Before you sink an hour into configuration, confirm the topology actually imported the way the author drew it. CML recreates nodes and links exactly from the YAML, but a wrong image mapping or a node that quietly failed to boot can leave you chasing a "bug" that is really a missing device. Start every node, wait for each console to reach a prompt, then walk the box: interfaces first, then neighbors, then any existing config.
Three checks cover most of it. show ip interface brief tells you the expected interfaces are present and shows their state; on a fresh, unconfigured router those interfaces are administratively down until you no shutdown them, so that is normal, not a fault. Once both ends of a link are up, show cdp neighbors confirms you are wired to the devices the diagram promised, and show running-config reveals whether the lab shipped any startup config or you are starting clean. A neighbor that is missing — or one you did not expect — means the link map differs from the picture, and that is worth fixing before you route a single packet.
Treat this as a Layer 1/2 gate: nothing you configure at Layer 3 will behave until the underlay matches the intended topology. It takes two minutes and saves you from debugging routing on a link that was never actually connected.
R1# show ip interface brief
Interface              IP-Address   OK? Method Status                Protocol
GigabitEthernet0/0     unassigned   YES unset  administratively down  down
GigabitEthernet0/1     unassigned   YES unset  administratively down  down
Loopback0              unassigned   YES unset  up                     up
!
! after 'no shutdown' on both ends of the link:
R1# show cdp neighbors
Device ID   Local Intrfce   Holdtme   Capability   Platform   Port ID
R2          Gig 0/0         143       R B          IOSv       Gig 0/0
A worked example: finishing a two-router static-routing lab
Here is the whole flow on a minimal lab you might import. R1 and R2 are joined by one point-to-point link on 10.0.12.0/30 — a /30 gives exactly 2^2 − 2 = 2 usable addresses, which is all a point-to-point link needs. R1 takes .1, R2 takes .2, and each router carries a loopback (1.1.1.1 on R1, 2.2.2.2 on R2) standing in for a LAN. Right after import the interfaces are administratively down and unaddressed, so the first job is Layer 3 on the link.
With the link addressed and up, each router can reach its neighbor's connected interface but not the far-side loopback — there is no route to it yet. Add a static route pointing at the neighbor as the next hop. Because you supply a next-hop IP rather than an exit interface, IOS performs a recursive lookup: it resolves 10.0.12.2 to the interface that reaches it, then forwards. You could instead write the route to an exit interface (for example ip route 2.2.2.2 255.255.255.255 Gig0/0), which skips the recursion but relies on proxy-ARP to find the next hop — acceptable on a point-to-point link, less predictable on a multi-access segment.
A ping sourced from the loopback is the real test, because it exercises both the forward route (R1 to R2) and the return route (R2 to R1); one-directional static routing is the classic reason a ping fails, so never test without a source. When this passes you have reproduced exactly what a grader checks — reachability between the two loopbacks. That is the point of importing a graded lab: you configure it, verify it the same way the answer key does, and know before you submit whether you actually solved it.
! --- addressing on both ends of the /30 ---
R1(config)# interface Gig0/0
R1(config-if)# ip address 10.0.12.1 255.255.255.252
R1(config-if)# no shutdown
R2(config)# interface Gig0/0
R2(config-if)# ip address 10.0.12.2 255.255.255.252
R2(config-if)# no shutdown
!
! --- static routes to the far-side /32 loopbacks ---
R1(config)# ip route 2.2.2.2 255.255.255.255 10.0.12.2
R2(config)# ip route 1.1.1.1 255.255.255.255 10.0.12.1
!
! --- verify from R1 ---
R1# show ip route static
S    2.2.2.2/32 [1/0] via 10.0.12.2
R1# ping 2.2.2.2 source 1.1.1.1
!!!!!
Success rate is 100 percent (5/5)
Frequently asked questions
Do I need to install CML on my PC, or can I run a .yaml lab without the full CML server?
CML is a virtual appliance (distributed as an OVA/ISO) that runs inside a hypervisor, not a program you install like a desktop app. VMware Workstation on Windows/Linux and Fusion on Mac are the supported hosts and are now free for personal use, while VirtualBox is not a supported CML host. You always need a running CML instance to import and boot any .yaml topology.
Can I open a CML .yaml lab in Packet Tracer or GNS3 instead?
No, the formats are not interchangeable, and CML boots real Cisco IOS/IOS XE images while Packet Tracer only simulates a subset of commands. Packet Tracer can auto-grade a learner's work, but only inside pre-authored .pka activity files, not against a CML topology. If a lab ships as CML YAML, you need CML (or a compatible controller) to run it.
Why did my imported lab boot with blank, unconfigured devices?
A CML YAML only carries startup configuration if the author saved it into the topology, and many shared labs ship the devices unconfigured on purpose so you build them yourself. Also note that router interfaces come up administratively down by default, so 'no configuration' plus 'shut interfaces' is the normal starting state. If a lab was meant to start pre-configured, check each node's Config tab in CML, or re-import a version that actually embeds the startup config.
Will my configuration survive stopping and restarting the lab?
Stopping a lab preserves node state, but wiping a node rebuilds it from the topology's stored startup config and discards whatever you had in running-config. If you want to keep your work, copy or extract the configs (or 'write' them into the node's startup) before wiping. CML always reconstructs a wiped node from the image plus the saved startup config, not from your last live session.
The node says 'started' but the console is blank — is it broken?
Usually not; a freshly booted IOS/IOS XE node can take a couple of minutes to reach a login prompt after CML flags it as 'started,' and pressing Enter once will often wake the console. If it stays blank far longer, the node likely never received its image or ran short on host RAM/CPU. Verify the image reference the lab uses and the resources available on your hypervisor before assuming the topology itself is faulty.
The lab imported but its nodes won't start or show 'no image' — what's wrong?
This almost always means the reference platform images weren't installed when you set CML up. CML boots every device from a node/image definition, so a topology can import cleanly while the nodes have no image to run. Install Cisco's reference platform (a first-time setup step) and confirm each node type shows an installed image under Tools → Node and Image Definitions. Goldfish Networks labs only use the standard reference-platform types — 'iol-xe' (IOL router), 'ioll2-xe' (IOL Layer 2 switch), and 'alpine' (Linux host) — so installing the reference platform once makes every lab importable.
Labs to import first
Import one the way this guide shows, configure it, then upload it for a grade.
Practice on real Cisco IOS
Build it on real Cisco IOS and get instant pass/fail grading on your own config.